Images can often make or break a sale or conversion. As they say — an image is worth 1000 words!
However, they can have a huge impact on website speed. A majority of the data transferred on website loads turn out to be images — about 63% according to the HTTP Archive Web Almanac. For eCommerce sites, that number is likely a lot higher. If images load slowly, or don't load at all, it won't just make for a poor experience for the user — it will also slow down the rest of the website.
We use Image CDNs (Content Delivery Networks) to make it as easy as possible for us to build websites that perform great when it comes to images — without sacrificing the design or imagery.
How image performance is traditionally tackled on the web
We encourage our clients to upload images at the best quality they have, which means a typical image might come from a studio camera and be up to 10MB in size. This doesn't seem like much in a world of MicroSD cards with hundreds of gigabytes of storage, but when it comes to downloading images over a mobile network, it’s huge.
I tested a website with a 2.3MB image on my phone's 4G in a city and it took around 14s to download. The same page on the rural 3G internet (that still covers quite a lot of the UK) took almost a minute! Multiply that by 10-20 for your average, well-designed website and you can guarantee the users won't bother hanging around. Any improvement we can make to how fast images load could be the difference between a user clicking ‘X’ or converting. And this is without taking into account the people on restricted data plans where that image might be 2-3% of their data for the month.
So we need to reduce the size of images on webpages, but we can't just squash them smaller without considering a few things.
Responsive images
Websites are displayed at all sorts of screen sizes, widths and resolutions — the same website might be on a small budget smartphone or a huge desktop monitor! This makes resizing images and decreasing the resolution a bit tricky. Ideally, we should download an image at the size we need it, but how do we know the size?
The web gives us a way to specify lots of image sizes. The browser then downloads whichever one it needs, factoring in screen size and screen density/'retina' displays.
<img
src="/our-image.jpg"
srcset="
/our-image-300x200.jpg 300w,
/our-image-768x512.jpg 768w,
/our-image-1024x683.jpg 1024w,
/our-image-1536x1024.jpg 1536w
"
sizes="(min-width: 800px) 768px, 100vw"
...
>
For every image that's a lot of resizing to do!
Optimisation and Image Format
JPEG, PNG and GIFs are still what most images are saved as. However, new image formats (including WebP, AVIF and JPEG XL) have the ability to compress images by discarding detail that viewers can't see.
I took a demo image in a JPEG format at 3MB and used a JPEG compressor to reduce it to 600kB. But converting it to WebP, AVIF and JPEG XL, it came out as 360kB, 280kB and 240kB respectively. A massive improvement on our original image.
Unfortunately, we can't just use the best one — different browsers and operating systems support different formats. While WebP is recently supported across the board, Safari doesn't yet support AVIF and no browser supports JPEG XL yet.
Ideally, we’d offer the best a browser supports. But that means generating even more image files before taking on a bit of a tricky setup.
Hi-DPI displays and quality levels
Mobile and tablet devices (and some laptops) have screen resolutions that are similar to a desktop but are a lot smaller. This means a phone may use an image the same resolution as a desktop when it's not at all needed for the small phone screen. You can find out more about this technique from the post "Halve the size of images by optimising for high density displays" by Jack Archibald but it's something that's worth considering for a high performing website.
When you optimise images manually, you will use a 'quality' option or slider. It probably goes from 0–100%, where approaching 0 the image will be compressed more to reduce data, and the worse it will look. Best practice would be to set the slider as low as possible without seeing any meaningful loss in quality. However, a simple image without much detail may compress to 55% without any difference, whilst a busy, high detail action photo may need more like 90%. This makes automatic optimisation tricky and less efficient, as to keep both of these images looking great we set it to 90%, wasting data on the simple image.
How platforms handle it
Depending on what you use for your CMS/website platform and how good your developers are, your website may already be using some of the above. Most CMSs will convert or resize every image on upload and serve them from the same hosting. However, this has its downsides:
- Large storage requirements as every image is converted to ~40 different formats;
- Slow upload speeds while images are processed;
- The impact of image requests on your web server ;
- The CMS doesn't support different image formats or compression;
- Makes development slower or more difficult;
- Images stored in a code repository makes code management harder.
A combination of these issues made managing images difficult. That’s why we searched for an easier option.
Why Image CDNs are the way forward
We've mentioned Image CDNs previously, but what actually is an Image CDN?
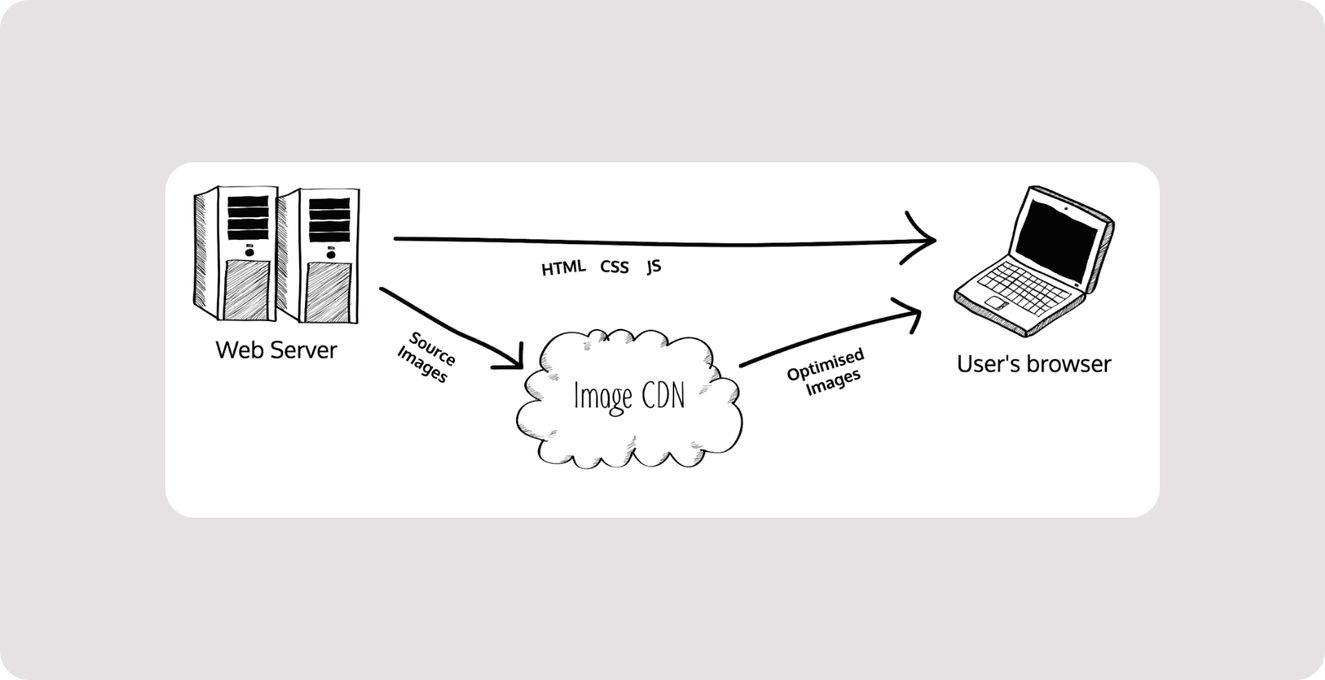
An Image CDN is a Content Delivery Network that specialises in Images. It's a third-party service that hooks up to your website and takes over the job of manipulating images.
Most of the time they sit between the web server of your website and the user, 'transforming' images on the fly based on the image URLs.
Why we love Image CDNs
Image CDNs take so many of the best practices for image performance that are difficult to implement and give them to us for no effort and very little cost. The features vary depending on the exact provider, but some of the benefits include:
- Converting images into the best format the browser can support;
- Automatically determining the quality level depending on the image;
- Offloading the load, cost and time of image processing away from the CMS and hosting;
- Making generating images a lot easier for developers by just adding some info to the URL;
- For mixed-platform agencies (Series Eight builds Craft and Shopify sites) it's one workflow for all projects.
How to implement an Image CDN
How you implement an Image CDN depends on the CMS you use, the Image CDN provider and how you set it up. But the simplest setup is putting images on your website or a storage bucket like S3 and configuring the Image CDN to pull images from there. Then you put together a URL:
https://oursite.imagecdn.com
/example.jpg
?format=auto
&w=900&h=600
&q=high
Let’s go through this URL line-by-line:
- The subdomain you set up with the Image CDN when you set up an account;
- Specify which image we'd like to use by name or URL;
- Automatically set the format to the best that’s supported;
- The image should be resized or cropped to a width of 900 pixels and height of 600 pixels;
- Finally use the ‘high’ quality profile the CDN provides
The syntax varies depending on the provider, but doesn’t vary too much from this. Using this simple syntax you'd change some of these parameters — just using text within the URL — and the image served will be different. That is so much easier and faster than having to generate new image sizes or transforms for every instance.
Shopify sites
As Shopify tries to make its tools as developer-friendly as it can, a basic Image CDN is actually already included with your Shopify plan for free!
A simple Shopify Image CDN implementation would look like this:
<img
    src="{{ product.featured_image | image_url: width: 600, height: 300 }}"
    srcset="
       {{ product.featured_image | image_url: width: 500, height: 250 }} 500w,
       {{ product.featured_image | image_url: width: 600, height: 300 }} 600w,
       {{ product.featured_image | image_url: width: 750, height: 375 }} 750w,
       {{ product.featured_image | image_url: width: 900, height: 900 }} 900w
    "
    sizes="(min-width: 768px) 50vw, 100vw"
    width="600"
    height="300"
    alt="{{ product.featured_image.alt }}"
    loading="lazy"
    decoding="async"
>
I also have a more advanced Snippet for image processing in Shopify that more intelligently retrieves the image sizes and prevents Shopify from cropping mis-sized images poorly.
Shopify's Image CDN does a good job to get started, including automatically converting to WebP if it's supported, optimising images and making it easy for developers to generate new images. It doesn't have more advanced functionality like AVIF support, format quality comparison, or the ability to define a quality level — essential for the hi-dpi practice. It can also change the aspect ratio of images when they’ve been uploaded too small — something to watch out for!
If you're looking to really push the performance of your Shopify site as much as you can you could consider using a third-party Image CDN like Imgix, Cloudinary or CloudImage.
Craft CMS
Craft CMS has the ability to 'transform' images, which will resize and convert images on your Craft server and save them in the server's files or storage bucket. This has some of the limitations I listed above and an Image CDN makes it a lot easier to work with. Craft also makes it easy to set up an Image CDN.
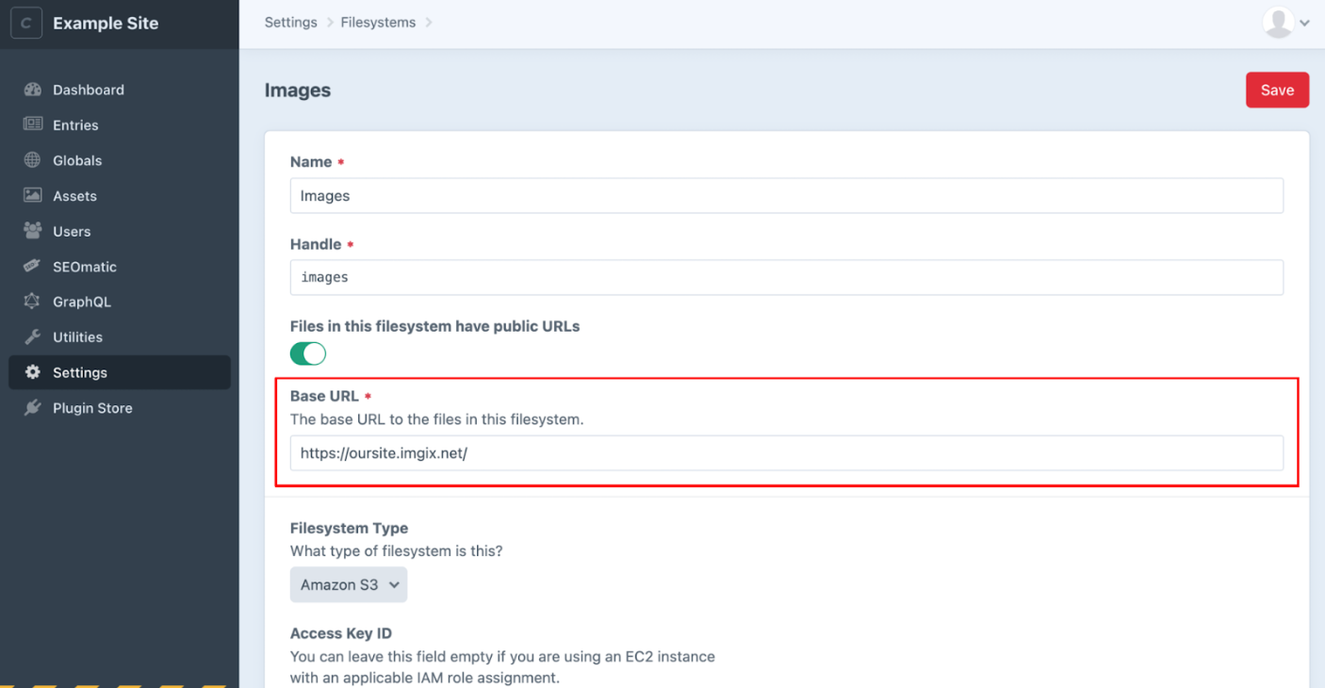
We use Craft's AWS S3 integration to store images elsewhere and link Imgix to the same S3 bucket. This means the only change needed in Craft is to point the public URL of your ‘Filesystem’ to the Image CDN subdomain.
A simple implementation of how you can use an Image CDN in Craft with Twig looks like this:
<img
    src="{{ image.url }}?auto=format,compress&w=600&h=300"
    srcset="
        {{ image.url }}?auto=format,compress&w=500&h=250 500w,
        {{ image.url }}?auto=format,compress&w=600&h=300 600w,
        {{ image.url }}?auto=format,compress&w=750&h=375 750w,
        {{ image.url }}?auto=format,compress&w=900&h=900 900w
    "
    sizes="(min-width: 768px) 50vw, 100vw"
    width="600"
    height="300"
    alt="{{ image.alt }}"
    loading="lazy"
    decoding="async"
>
See the code for my twig component for a full implementation including hi-dpi images.
Using an Image CDN provider like Imgix handles format conversion — even to AVIF — automatic optimisation, format quality comparison and makes it really easy for developers to generate different image sizes.
Other platforms
Image CDNs can work in pretty much any circumstance to improve the performance of images and the ease of development. I've personally also built WordPress, Jamstack and React sites using Image CDNs, and know of others having used them to make images on .NET, Umbraco, Java, custom frameworks sites and even iOS and Android apps easier!
And now we’ve talked you into it…
Image manipulation and optimisation on the web can be tricky — and there’s lots to keep track of! Image CDNs make it so much easier to manage images when developing, so much so that personally I use them on every site I work on — no matter how small or large.
If you’re a developer looking to improve the performance of images on the sites you build, consider trying out an Image CDN and seeing how it improves your workflow and sites. And if you really want to dig into the details I’d recommend reading Addy Osmani’s book Image Optimization.

